
Aquarium Cleaning | Reasons and Methods for Water Changes
Freshwater & Saltwater
Freshwater & Saltwater
Reasons for Water Changes
The Reasons "WHY" are the MOST important aspects of why we clean and change our aquariums water.
All other aspects such as the 'How' you perform your aquarium cleaning and how often are all determined by “"the reasons why"!
What I mean by this previous statement is that the frequency, size, and methods of water changes are more subjective, however whatever method you choose, it should always come back to the objective of certain water parameters (which these too can vary as per fish kept).
It is also worth noting that most of these “Reasons for Water Changes” are interrelated, so addressing one reason often has an effect on another; the results can be ignoring one "reason" often has a domino effect on other reasons". As well, testing for certain parameters is an objective way to determine whether a water change needs to be performed, as well as frequency and percentage.
(1) Nitrate control: A nitrate level of 15-20 ppm or less is best for saltwater fish (10 ppm or less for Reef), 40-50 ppm or less for Freshwater fish. With a Planted Freshwater aquarium, a Nitrate level of at least 15 ppm is better, as plants need some bio available nitrates in the water column.
Use your nitrate level as a gauge (in an established aquarium) when to change your water. If your goal is to keep nitrates at a maximum of 40-50 ppm (20 or less is considered more optimum), change water whenever nitrates reach this level.
Please note for marine aquarists; an average protein skimmer often cannot keep up with the organic waste output of an average stocked marine aquarium, although many modern Marine Protein Skimmers do a much better job than they did as recently as the 1990s especially when coupled to a good Ozonizer.
This means water changes along with other methods for organic removal and nitrate control are still usually necessary in marine aquariums with a protein skimmer. There are obviously exceptions in a reef aquarium with large amounts of live rock and live sand, heavy plant or green algae growth, and light bio/animal load.
It is also noteworthy with marine aquariums, utilizing other methods for nitrate control other than just water changes are important since the cost of a quality marine salt can get quite expensive if large percentage water changes are needed.Based on my experience in keeping 100s of marine aquariums over the years, if you need to change more than 20-25% of the water once per month to maintain low nitrates, YOU HAVE AN ISSUE WITH YOUR SYSTEM AND MAINTENANCE METHOD!
With this in mind, please read the Nitrate Control article linked to later in this section and consider all the methods noted, even products such as Algone can sometimes make a difference and are certainly cheaper than a good salt mix (which I've had mixed results with Algone, but it is also not expensive).
Product Resources:
• Algone for small to large aquariums
I often have told my clients/customers that Nitrate removal was an important reason for water changes, and utilizing vacuuming as a method of removing organic mulm is an effective way of maintaining low nitrates (especially in the absence of nitrogen reducing anaerobic filter bed). See Reference Note. Also, as far as Nitrates, especially in marine aquariums, removing organic debris before it "cycles" via vacuuming (although this is where a protein skimmer comes in as well) is in my opinion, the main focus of nitrate removal via water change.
In freshwater aquariums (especially in the absence of a large amount of thriving plants), water changes using a gravel vacuum to remove ALL the organic mulm before it goes through the full nitrifying part of the nitrogen cycle plays a major part of controlling nitrates in a freshwater aquarium. The importance is amplified for tanks where Under Gravel Filters are employed. With these filters it is best to occasionally remove the lift tubes and siphon directly under the plate.
Test: Whatever number that exceeds what you establish as maximum nitrates such as 40 ppm may indicate a water change is needed. As an example, if you have gone several weeks without a water change and your nitrates are above the desired number, odds are this indicates more frequent water changes are needed.
However if thoroughly vacuumed 20% water changes are performed once per week and nitrates are still high, this may indicate a bio load too high for the aquarium filtration capacity and/or the need for additional nitrate control methods (of which there are many)Continued high nitrates may also indicate poor method of water change; if you are only changing water directly from the water column and not using a gravel vacuum and cleaning dirty media, you can perform a large water change and have a less effective water change than one have the volume where a vacuum is employed and where filter media is cleaned/rinsed.
Please read these articles for more about Nitrates & related information:
• Aquarium Nitrogen Cycle
• Aquarium Nitrates; Methods for Control
• Hydrogen Sulfides/Nitrates
• Bio Load in an Aquarium or Pond
(2) GH and Electrolytes: Positive mineral ions; this is related to the above point. Water changes will often (but not always or completely) replenish necessary electrolytes when tap or well water are used. This is why RO water should ALWAYS be re-mineralized.
This is an important reason that is often missed in determining whether or not adequate methods, frequency, etc. of water changes are being utilized. If your aquarium mineral ions/electrolytes are low, you are likely in need of a water change using water high in electrolytes/mineral Cations and/or should be employing products such as Wonder Shells, Aragamight, SeaChem Replenish and possibly aragonite.
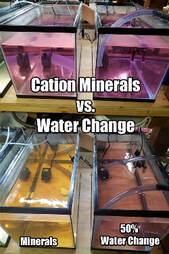
The above point in mind, an aquarium keeper also needs to understand that a water changes usually still does not address oxidative stress. This is IMPORTANT as this part of the Redox equation is partly why we change water, yet simple tests prove it not entirely effective even with the help of a Redox reducer such as AAP/SeaChem Prime.
The picture above clearly demonstrates how even a 50% water change using Prime too does not completely remove the oxidizer added for this test (Potassium Permanganate) compared to the tank utilizing an AAP Wonder Shell. The aquarium on the right had a 50% water change after the introduction of potassium permanganate while the aquarium on the left only had 1/2 of a Medium AAP Wonder shell.
References:
• Aquarium Redox; As it Pertains to Aquarium Fish
• Aquarium Chemistry
It should be noted that aragonite often will not respond rapidly enough to lower mineral levels as compared to Wonder Shells, Seachem Replenish or Equilibrium, or simple water changes with water rich in mineral cations (positive mineral ions/electrolytes). Without adequate mineralization, your fish will suffer from poor osmoregulation and as well this will lower your Redox balance.
Product References:
• Wonder Shells- Mineral Ion Dissolving Block
• SeaChem Replenish Mineral Ion Supplement
• SeaChem Prime Aquarium Conditioner
Test: a GH test is likely not going to be accurate for a water change as most residual minerals remain even when tests remain within desired parameters. That said any lower number of desired GH such as 150 ppm indicates either a need of more GH additives and/or a water change.
Reference:
• Depletion of Positive Ions
(3) pH and KH control: Maintaining a healthy pH & KH; Ph levels have a tendency to drop from biological activity, while KH is the pH buffering ability of the water and that too can decrease between water changes.
KH is VERY important, and often when an aquarium keeper does not keep up with adequate cleaning schedules and add supplemental buffers, this can result in sudden spikes/drops in PH from a water change (or between changes). This is a major problem I have seen over the years in my maintenance business when calling on customers (not regular/contract maintenance clients) who seemed to always have problems with their aquariums and claimed cleaning their aquarium caused their problems, which of course is not true, rather it was maintenance of KH between cleanings and/or poor cleaning practices and frequency.
Maintaining a proper KH between cleanings is important. The use of Buffers, such as SeaChem Buffers will help with KH maintenance between water changes or to add to tap or well water prior to introduction to the aquarium with lower than desired KH (& pH)
Product Resource:
• SeaChem Marine, Malawi, Alkaline, Buffers
It should be noted that when large volume of water changes are necessary for whatever reason, it is important to make sure that the new water added does not result in “roller coaster” pH reading. The osmotic stress on the fish caused by a sudden shift in pH can be harmful or even deadly. This consideration is especially important with fish such as Discus where a water change may cause a sudden spike in pH unless pH/KH adjusted new water, or partial or even 100% re-mineralized RO water is used.
Reference:
• Fish Osmoregulation, RO Water Use
Test: Unlike GH, carbonate buffers (KH) are often quickly depleted and any lower number under the desired KH target such as 100 ppm indicates the need for a water change and/or addition of buffers.
An unstable pH indicates similar actions. Often if nitrates and other cleaning indicators are stable, the addition of KH buffers and GH mineral ion supplements are ALL that is necessary, and a water change is NOT indicated.
(4) Lowering of DOC & Removal of Organic Mulm (Sludge): DOC stands for Dissolved Organic Compounds (some refer to the ‘C’ in this abbreviation as Carbon which would relate to carbon-based molecules). This is inter-related to some of the other reasons such Redox, Bio Load, Nitrates, even KH & pH (as often high DOC will have an end result of lowering pH). This also includes removal of mulm/sludge from under-gravel filter plates (placing a siphon tube directly under a plate often has worked well for me) as well as removal of this mulm/sludge from canister and sometimes even wet/dry filters.
Reference:
• Aquarium Bio Load
This is one of the more important reasons from my years of experience as well as some controlled tests since DOC in the water column and Organic Mulm/Sludge under the gravel, decorations, rocks, etc. can have a profound effect on so many aspects of aquarium health such as the previously noted Nitrates, Redox, and even opportunistic diseases, in particular Saprolegnia/Fungus and Aeromonas.
References:
• Treatment and prevention of Saprolegnia and Fungus
• Treatment and prevention of Aeromonas and Septicemia
This is achieved two ways in cleanings: Simply removing water on a regular basis removes DOC from the water column.
The second aspect is surprisingly misunderstood, even by experienced aquarists and that is by thorough vacuuming of organic mulm, you remove a major cause/source of DOC. This is also why just siphoning off water is a very poor method of aquarium cleanings/water changes. It is noteworthy that it is quality of water changes, not quantity that truly matters (my years of experience and experiments bears this out too).
A Vortex Diatom Filter can aid in removal of Organic Mulm/Sludge, although the gravel must be constantly stirred to make this device fully effective. However not only is this not usually possible, but this is also much more stressful to fish (I have used Diatom filters for years and they are still excellent devices when used properly).
Another device, the electric (battery powered) “Bag” vacuums are not nearly as efficient as Diatom Filters. These use a bag that does not even trap 25% of the DOC causing mulm that a true micron filter can do. My tests measuring Nitrates, KH, & Redox show this.
An exception to this would be the Eheim Sludge Remover Battery Vacuum, as it uses a much better reusable micron filter than the older style “Bag” battery Vacuums. Although the Eheim Battery Vacuum is not as effective to Diatom Filters, these devices make up for it in vastly less agitation of the substrate into the water column and thus MUCH less stress on the fish.
Product Reference:
• Eheim Sludge Remover Battery Vacuum
I should note that none of these devices still take the place of a water change in my experience/tests.
Test: Similar test to Nitrates, so besides visual indicators; high amounts of DOC & mulm will generally be indicated in rising nitrates, unstable pH, and dropping KH.

(5) Removal of harmful elements: There are many toxins that can be introduced, airborne or in other ways enter the aquarium that are not easily measured. Carbon may help with this as well, but should not be overused. SeaChem Purigen is even more effective for this than carbon, but still should not be used to take the place of water changes, only improve water quality in between.
Reference:
• Aquarium Carbon Use
Product Reference:
• SeaChem Purigen
Test: No 100% applicable test, although yellowing of the water, followed by clarity after using these products may be a partial indicator. However if carbon is not affective or known toxins have been introduced by accident or for whatever reason to the aquarium; a water change is a must along with use of carbon and/or Purigen
(6) Control of Bio Load: Although an aquarium cleaning/water change is not the long term answer to an over crowded, over fed, and under filtered aquarium; cleanings are certainly necessary to lower your bio load by removal of decaying organics in your gravel, under décor, and often in under maintained filters as well.
A common symptom of a high organic load is rapidly dropping pH and KH as well as sighting of Detritus Worms during cleanings or when oxygen levels drop (these worms will rise to the surface when oxygen levels are low seeking oxygen). These Worms are often misidentified as Planaria by many spam websites that now dominate the internet (especially in Google Search), however they are NOT Planaria.
For more on this subject, please read this article:
• Trematodes and Nematodes/ Detritus Worms
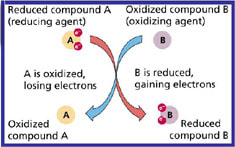
(7) Redox Potential: This is an often-unknown parameter to many aquarists but is actually quite important, especially with newer research I have uncovered.
That said most freshwater aquarists usually do not need to worry too much about this parameter if water changes and other aspects of good aquatic husbandry are observed (for marine aquariums this is even more important and is often not as easily maintained). However, I would recommend learning more about this parameter if you are a serious aquarist. Understanding the Redox Balance effect on fish health, and how correct levels of mineral cations and the use of a high dwell time TRUE UV Sterilizer can help, as well as water changes.
Product Resource:
• TMC Vecton/Advantage High Dwell Time True UV Sterilizers
|

|
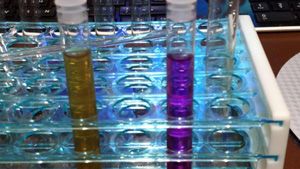
Test: A simple test using Potassium Permanganate (Jungle Clearwater which is is 2% KMnO4 is used).
EXAMPLE: First, get sample(s), the one on the right is water from 40-gallon low bio load freshwater aquarium, and the one on the left is from a 10-gallon Turtle Condo. Both the tanks had a 20% Water change 1 day prior to this test.
Test tubes with lids are used, the ones that come with test kits are just fine as well. To each, I added one or two drops of PP (Potassium Permanganate) so they had the vibrant purple color. Within 1 minute, the reptile water, though clear in the tank, went from the pink as seen on the right, to cloudy yellow 'urine sample'. Then 24 hours later, the one on the right is still pink (Low DOC/Dissolved Organic Content), while the one that is yellow in the photo above is now clear (lower photo, click to enlarge).
This test tells you roughly 3 different things: Idea on Redox (whether aquarium is reducing or 0), Dissolved Organic Content, and "Health", by the combination of them. You want the water to not change from pink right away, that happens from too much stuff in the water column, and along with the water being too far into reducing Redox.
The second photo is the important one. All that brown stuff at the bottom of the test tube is Dissolved Organic Content that has died and gotten clumped together. The water sample itself and water in the tank it came from "looks perfect". This 1-day long test gives you a more complete unscientific idea of how long you've put off changing your water.
So, here's the summary of "How to "Test":
• Fill Test Tube with Water from aquarium.
• Add one drop of PP.
• Check to ensure it's pink after 5 minutes, and then after 24 hours.
Reference:
• The Quick Aquarium Health Test - PP / KMnO4 Test
For further information, please read:
• Aquarium Redox Balance
• The use of UV Sterilization for Aquarium Redox. This is a MUST read with the plethora of junk UV Sterilizers now flooding the market that are in reality only water clarifiers, not true UV Sterilizers!
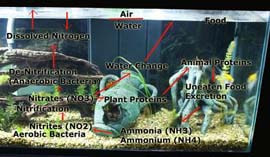
(8) Removal of waste: Before it can go thru the Nitrogen Cycle. This is related to other aspects/reason for water changes, although here I specifically mean the removal nitrogenous waste molecules in the water column that begin with ammonia, to nitrites and then end up as nitrates. Water changes can lower these nitrogenous molecules (ammonia, etc.) prior to the cycling process thus resulting on lower nitrates as noted in section #1.
As well in tanks that have been medicated, especially with gram positive medications such as Erythromycin a water change lowers pressure on a damaged or even destroyed bio filter and thus removes dangerous ammonia ions. Devices such as Protein Skimmers (marine tanks only) can be an aid to this process as well.
Please see this article for vastly more on this subject:
• Aquarium Nitrogen Cycle
Product Reference:
• Aquarium Pharmaceuticals Erythromycin
Test: Again, similar test to Nitrates (& pH/KH), so besides visual indicators; high amounts of wastes (such as fecal matters) will generally be indicated in rising nitrates, unstable pH, and dropping KH. Poor Filtration may also be indicated.
(9) Control of algae growth: This aspect is often missed yet is very basic. Water changes (assuming replacement with water that has natural balanced nutrients) will generally return the proper balances of Macro nutrients (PO4, NO3, K) to a freshwater tank for plants to out compete algae. In saltwater excess nutrients are removed, again allowing for less algae growth.
Test: No applicable test other than noticeable less algae growth.
(10) Rinsing of bio-sponges, media, etc.: In used aquarium or de-chlorinated tap water (generally not straight tap water). This includes sponge filters, bio balls, and ceramic media in canister filters (canister filters need to be cleaned more often than many aquarists think due to nitrate producing and KH reducing mulm buildup).
Occasionally I do not use de-chlorinated tap water or used aquarium water to rinse all parts of a canister filter such as mechanical filtration poly pads, or even some sponges. The reason is if there is more than adequate amounts on ammonia/nitrite reducing nitrifying bacteria and you aquarium nitrates are quite high, this can indicate your aerobic nitrifying filter media has become a "nitrate factory" (I always leave at least the ceramic, volcanic rock, SeaChem Matrix or other bio media rinsed in only de-chlorinated water so as to preserve nitrifying or de-nitrifying bacteria behind).
As well either at the time of water change or a midway point (or similar) between water changes, chemical filter products such as Carbon or SeaChem Purigen should be changed.
Rinsing of filter media is not quite a “reason for water change” (more a reason for maintenance/cleaning), but is certainly a part of regular tank maintenance that should not be ignored.
(11) Disease eradication: Changing water for disease eradication may not solve the problem but may be a step towards the problem when done in conjunction with medications/treatments (even bleaching's and subsequent aquarium re-starts).
Since this is not really the scope (purpose) of this article, please see this article where I give some water change examples for disease/parasite problems:
• Aquarium Disease Prevention
I will also note that water changes are important prior to each treatment with aquatic medications so as to lower medication absorbing DOC and “spent” medications themselves so as to render more effective treatments.
Read this article:
• Aquarium Medications; Part 1
As well, changing water, especially using a gravel vacuum to go through gravel lowers many pathogens in the aquarium, even including Ich trophonts. As discussed later in this article in the "Methods" section, the use of a gravel vacuum does a better job than stirring or digging of the gravel for the removal of pathogens and trophonts. Using a gravel vacuum is also less stressful to the fish based on my years of professional aquarium maintenance experimentation.
Test: No applicable test, although small water changes after EVERY treatment and a larger water change after finishing treatment is strongly recommended so as to lower medication absorbing compounds in the water column.
• All these reasons are based on 30+ years of professional aquarium maintenance with some of the largest accounts in Los Angeles, CA. The above section is the most objective aspect of this article, everything that follows is more subjective and utilizing whatever cleaning method, frequency, or combinations thereof are all determined by achieving the above criteria which admittedly is not all as important as each other, however I would consider points 1-8 essential based on both experience and scientifically controlled tests/studies.
Summary of "Reasons for Water Changes": My point is that a 25% water change every 2-4 weeks may be all that is required to maintain correct water parameters due to excellent filtration, nitrate removal methods, and chemistry husbandry by one aquarist but not adequate for another aquarist due to a high bio load, lesser filtration, less than stable water parameters, etc.! Or one aquarist may do fine with the German/Walstead or flow through method while another may fail and the use of products such as the Aquarium Cleaning Machine or Eheim Sludge Remover may be necessary for DOC control.
It is also noteworthy that despite some rather passionate persons on both sides of the how much, why, and frequency of water changes, my vast experience & keeping notes in caring for literally 1000s aquariums in my large aquarium maintenance company THAT THERE IS NO ONE EXACT FORMULA THAT FITS ALL! Changing water efficiently and keeping fish alive was my bread & butter and was a major reason for my success in this my aquarium maintenance & design business. So if someone advocates that with their method you never have to change water or the opposite, large water changes weekly are the only way to control nitrates, etc. be very cautious of such advice.
HOWEVER, if your aquarium requires 100% water changes every week to maintain stable pH, nitrate, ammonia, etc; My experience with such aquariums has shown these problems: Poor chemistry maintenance procedures.
Please Read/Reference:
• Aquarium Chemistry & Use of RO or Water Softener in Aquarium
A Nitrogen Cycle that is not properly established. See:
• Aquarium Nitrogen Cycle
Inadequate Filtration. See:
• Aquarium Filtration & Aquarium Filter Media, Material; Mechanical, Bio, Chemical
Poor Redox Balance (including lack of UV Sterilization in aquariums where it can aid in improving this parameter. See:
• Aquarium Redox Balance
Poor Cleaning Methods See:
• Further in this article
Too High a bio load related to Nitrogen Cycle. Also see:
• Freshwater Basics & Bio Load in an Aquarium or Pond
Frequency & Volume of Water Change
Use these factors to determine frequency (& possibly volume/size). Keep in mind that this is a subject that is mostly dependent upon many objective factors of water parameters (as with "Reasons"). Type of fish, such as fish that naturally produce more waste (partly due to the type of food they eat) such as goldfish where one fish per 8+ gallons of water is better. Also, a large and dirty fish such as an Oscar is another good example.
Filtration, a well filtered aquarium (good bio filtration, good mechanical filtration, and good circulation) with multiple filters is important.
Well maintained water chemistry: Including a stable kH and Redox balance (which includes mineral cations available to the fish).
• After proper feeding, filtration (including choice of filter media) good cleaning routines, as a starting point; 10-20% water changes with a gravel vacuum once per 2 weeks is suggested.
Often in a well-maintained aquarium as per stability of parameters, I have actually had aquariums perform very well with just 25% per month (or even longer). My extensive controlled test in the 1990s primarily with goldfish showed that if the filtration was correct for the bio load and the parameters were stable including the addition of products to maintain mineral cations and alkalinity; large and/or frequent water changes did NOT play a role in fish longevity. Please do not take this as, me not recommending water changes, rather just downplaying their importance in an otherwise well filtered, well maintained aquarium with proper supplementation.
If after all these are checked off and you still have nitrates that struggle to stay below 40-50 ppm (20 ppm for saltwater), you probably need to change more water or increase frequency and/or efficiency (especially if there are live plants!). Also, consideration into other Nitrate Control Methods should be undertaken.
References:
• Aquarium Nitrate Control
• Aquarium Bio Load
Also, a kH and pH that starts out at desired levels, but then drops quickly after water changes and/or the need for higher-than-normal recommended KH Buffers can indicate ineffective cleaning routines (as well as other problems such as mulm buildup).
• Caution should be used with larger volume water changes (especially over 50%) so as to not cause pH spikes either up or down, as well dramatic changes in other parameters as well. I would simply caution that these pH swings can cause considerable osmotic shock to fish during larger water changes if the “new” water is not correctly adjusted for pH/KH.
The use of large water changes to make up for poor aquatic management including a lack of an established Nitrogen Cycle should not be done.
My personal and professional experience has shown that rather than employ large water changes that some may use for sensitive fish such as Discus, I would recommend the use of an Eheim Sludge Remover Battery Gravel Vacuum in between water changes to remove excess organic waste/sludge/mulm.
Product Resource:
• Eheim Sludge Remover Battery Gravel Vacuum
In the case of high ammonia/nitrites: it is noteworthy that if your aquarium has copious amounts of decomposition in the absence of correct KH Buffers it likely will result in a low pH. A pH under 6.5 will convert much of your aquarium ammonia to nontoxic NH4 all the while slowing the nitrogen cycle and thus natural removal of ammonia. So, a sudden large water change that changes the pH, can and often will result in more toxic NH3 ammonia. This is vicious cycle of pH swings and high ammonia I have observed in particular with Betta bowls without any bio media.
See:
• Aquarium Nitrogen Cycle; High Ammonia for more.
In the case of bowls, finding methods to alleviate large water changes that can induce pH, osmotic, or oxidative stress is suggested. This would include a small sponge filter, use of Matrix in small containers or simply on the bottom of the bowl, and/or Wonder Shells (for continuous positive mineral ion replacement).
Product Resources:
• Aquarium Sponge Filters
• SeaChem Matrix is a High Porosity Bio Media
• Wonder Shells; Aquarium Mineral Ion Replenishing block
A flow-through water change system (see the methods section later in the article) is another answer to this question/potential problem of large water changes.
Simply put from my experience AND controlled tests NO Aquarium or bowl should have a 100% water change even for high ammonia other than if poisons (such as roach spray) are accidentally added.
Aquarium Cleaning Basics
For an established, healthy aquarium I generally recommend changing 10-20% of your aquarium water once per week (best) or at least 25%+ once per month. Keep in mind that these numbers are VERY generic, and as per "Reasons for Water Changes", these numbers can be altered greatly, which is why "Reason" was the first subject covered.
With good filtration and plants (live rock in marine aquaria), you often can go longer than once per week.
However on the flip side, if an aquarium is let go and there are copious organic mulm buildups, it may be necessary for a few closer together water changes or a large one that may even consist in water coming in while water is going out
Use a de-chlorinator such as Start Right or Prime (Prime also detoxifies ammonia and nitrites) while refilling your aquarium if tap water is used. All de-chlorinators work instantly usually comprised of Sodium Thiosulfate.
Product Resource:
• SeaChem Prime
Please note: Contrary to some information thrown around without much research, vacuuming the layers of gravel that contain aerobic (nitrifying) bacteria will NOT destroy the bacterial colonies, as research (that really is not that new) has shown these bacteria to secrete a glue-like substance to the media they cling to, and a gravel vacuum will NOT dislodge these bacteria.
See this article about the aquarium nitrogen cycle:
• NITROGEN CYCLE AND AQUARIUM CYCLING; How the Aquarium Nitrogen Cycle Works
STEPS: Unplug your heater so that it will not crack if the water level drops more than 1/3 of the way down the heater. This is best disconnected/unplugged 20 minutes before you begin changing water. Make sure and plug the heater back in after adding water.
Make sure and wipe down the sides of the aquarium with an aquarium scrubber that is used ONLY for the aquarium to avoid contamination. Try and remove unsightly algae and especially any slime or mold (rinse this off in a sink).
If you have hard water stains/buildup this can be removed with a razor blade ONLY with a glass aquarium. With acrylic aquariums, I recommend ONLY scrubbing pads that claim to be acrylic safe, otherwise you will slowly leave tiny scratches over time that will eventually make your aquarium acrylic look hazy.
Product Resource:
• Acrylic Aquarium Safe Scrubber Pads
Use this time to change filter media that NEEDS changing, do NOT go overboard and change all media or you risk destroying your aquarium’s bacterial colonies needed for removal of ammonia, nitrites, etc. HOB filters should have a second filter cartridge either in the filter or in the water column of the aquarium to allow for bacteria to form on this new cartridge before replacing the old one. If your HOB Filter has a sponge, bio grid or bio sponge, such as a SunSun HBL-702 Power Filter, or bio wheel; you only need to rinse these off in de-chlorinated tap or used tank water and there is no need to prepare a second cartridge before changing the old one.
For more about aquarium filters, please read this article:
• Aquarium Filtration and Filters
Product Resource:
• Rio 400 Power Filter
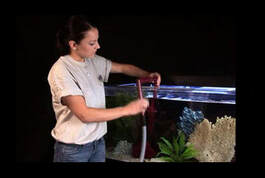
At this point you should change your water using a gravel vacuum, siphon, or similar method.
For more about methods of water change and procedures to refill your aquarium, please read further in this article under procedure.
With good filtration and plants (live rock in marine aquaria), you often can go longer than once per week.
However on the flip side, if an aquarium is let go and there are copious organic mulm buildups, it may be necessary for a few closer together water changes or a large one that may even consist in water coming in while water is going out
Use a de-chlorinator such as Start Right or Prime (Prime also detoxifies ammonia and nitrites) while refilling your aquarium if tap water is used. All de-chlorinators work instantly usually comprised of Sodium Thiosulfate.
Product Resource:
• SeaChem Prime
Please note: Contrary to some information thrown around without much research, vacuuming the layers of gravel that contain aerobic (nitrifying) bacteria will NOT destroy the bacterial colonies, as research (that really is not that new) has shown these bacteria to secrete a glue-like substance to the media they cling to, and a gravel vacuum will NOT dislodge these bacteria.
See this article about the aquarium nitrogen cycle:
• NITROGEN CYCLE AND AQUARIUM CYCLING; How the Aquarium Nitrogen Cycle Works
STEPS: Unplug your heater so that it will not crack if the water level drops more than 1/3 of the way down the heater. This is best disconnected/unplugged 20 minutes before you begin changing water. Make sure and plug the heater back in after adding water.
Make sure and wipe down the sides of the aquarium with an aquarium scrubber that is used ONLY for the aquarium to avoid contamination. Try and remove unsightly algae and especially any slime or mold (rinse this off in a sink).
If you have hard water stains/buildup this can be removed with a razor blade ONLY with a glass aquarium. With acrylic aquariums, I recommend ONLY scrubbing pads that claim to be acrylic safe, otherwise you will slowly leave tiny scratches over time that will eventually make your aquarium acrylic look hazy.
Product Resource:
• Acrylic Aquarium Safe Scrubber Pads
Use this time to change filter media that NEEDS changing, do NOT go overboard and change all media or you risk destroying your aquarium’s bacterial colonies needed for removal of ammonia, nitrites, etc. HOB filters should have a second filter cartridge either in the filter or in the water column of the aquarium to allow for bacteria to form on this new cartridge before replacing the old one. If your HOB Filter has a sponge, bio grid or bio sponge, such as a SunSun HBL-702 Power Filter, or bio wheel; you only need to rinse these off in de-chlorinated tap or used tank water and there is no need to prepare a second cartridge before changing the old one.
For more about aquarium filters, please read this article:
• Aquarium Filtration and Filters
Product Resource:
• Rio 400 Power Filter
At this point you should change your water using a gravel vacuum, siphon, or similar method.
For more about methods of water change and procedures to refill your aquarium, please read further in this article under procedure.
Methods for Water Change
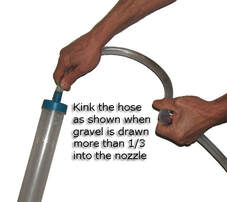
Basics: For cleaning your aquarium (freshwater or saltwater) a Gravel Vacuum attached to a siphon or re-circulating filter works best. These vacuums are quite easy to use; simply push the bell of the vacuum into the gravel and quickly back out. If you are having problems with sucking gravel into the siphon hose, try kinking the hose with your other hand to slow the out flow to keep gravel from being sucked up.
Make sure and lift ornaments out of the way and vacuum in as many dead spots as possible. It is important to get as much of this organic “mulm” out of the aquarium as possible as this is what leads to higher nitrates, ph crashes (due to nitric acid production during decay) and resulting in poor KH levels.
As a generalization based on my decades of professional aquarium cleaning over literally 1000s of aquariums, the proper use of an aquarium vacuum that includes vacuuming under ornaments and rocks as well as rinsing and/or changing of dirty filter media with smaller 25% water changes (or less) will make more difference than large water changes.
In fact I've made fast water changes where I simply stuck a siphon in an aquarium at my largest service client (the Bahooka Restaurant with over 100 aquariums, most over 100 gallons), all the while I changed less than half the water in a nearby aquarium using the vacuum (& more) and while nitrates were the same at the time of changing, a check one week later showed lower nitrates on the aquarium with the smaller but more correct cleaning procedure.
Product Resource:
• Lees Aquarium Gravel Vacuum
Do NOT remove gravel/substrate to clean!
At the most if the substrate is unusually dirty or you would prefer a new gravel/substrate for aesthetic reasons, I recommend removing at most 1/3 of the gravel at 3–4-week intervals. If there is a high organic build up in the substrate/gravel that require too frequent and/or large water changes* with a gravel vacuum, besides cutting back on feeding and other contributing factors, the use a Sludge Remover Vacuum as shown in the picture above might be suggested.
By too frequent or large water changes, I mean water change volumes or frequency that as per testing of water parameters adversely affects the nitrogen cycle (ammonia, nitrite levels), water clarity begins to deteriorate, or fish begin to show signs of stress that do not go away a few hours after the water change)
As noted earlier, if organic mulm build up is so bad, you may need to add water while changing it to get the aquarium to a reasonably clean state. Make sure that water coming in though is temperature & ph adjusted.
Starting the Gravel Vacuum is usually quite simple (depending upon the brand though). With the Lees, simply placing the end of the hose (water exhaust) into a bucket, the turning the “bell” of the vacuum into the tank and rotating it to remove air, then moving the vacuum bell up & down with quick actions will allow the quick start valve to start the siphon. If this valve breaks (the valve rarely lasts as long as the vacuum) or you have a vacuum without this feature, a quick “suck” on the end of the tube (below tank level) into the bucket should start the siphon with little effort.
Tips to starting a basic gravel vacuum:
Using a gravel vacuum such as the Lees Gravel Vacuum with a start valve and shaking it up and down a few times.
Filling the bell with water while plugging the small end then placing the bell quickly into the water.
A quick suck (not as nasty as it sounds if done quickly).
Attaching to a long hose and running water in to the hose from a faucet, then disconnecting allowing gravity to drain out the door (into a garden or even a toilet), this is the method I used most for my large aquariums, especially in offices I maintained in my service business. This applies to Pythons and similar.
Further Siphon Tips (including attached to hose): If your vacuum siphon does not start easily, this may mean that you have some water in the tubing that is blocking the siphon; ANY amount of water in the siphon tube can block the siphon from starting (even a tablespoon), especially when the tube has less vertical distance and more horizontal distance to where the water is exhausted to (bucket, garden, toilet, etc.).
Make sure to evacuate ALL water prior to attempting to start a siphon.
If your vacuum is connected to a hose or longer tubing, it is even more important to evacuate all water from this hose prior to starting the siphon. I recommend carefully rolling up the hose, keeping the end lower than the rest of the hose while all water is removed. You should store all hoes this way too for quicker siphon start in the future.
If you fail in the first attempt to start a siphon with a long hose attached, you may end up with water in the hose that will block future attempts, so starting over by making sure all water is evacuated will save you much frustration.
Otherwise, another method of starting a siphon with a long hose attached is to attach the female end of the hose to a faucet and turn on the faucet until all “bubbles” are blown out through the vacuum bell into the tank. Once this is done, simply detaching the hose from the faucet will immediately start the siphon.
Caution should be used in this second method that the vacuum bell is securely placed under the water and that you do not turn the hose on with too much force, otherwise this may result in the vacuum bell “jumping” out of the tank and making quite the mess or at the least the bell not staying under the surface of the water resulting in a failed siphon attempt.
Finally attaching the hose to a “siphon pump” at either a sink or the faucet makes draining the tank (starting a siphon) quite easy, however this also wastes much water (although you can detach the siphon pump after starting the siphon if the exhaust from the hose is below the water level of the tank).
Product Resource:
• Lees Siphon Pump
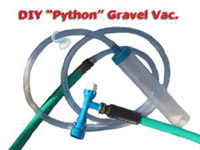
DIY Gravel Vacuum System (Python Style):
|
|
You can make a DIY Super Gravel Vacuum using 25' to 50' lengths of 5/8" ID Aquarium Tubing OR a sterile 5/8" garden hose (a sterile RV water hose is perfect), a Lees 10" Gravel Vacuum, some duct tape for wrapping around the end of the Vacuum tubing for a better fit, A Lees or Python Water Pump and faucet adapter.
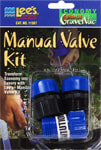
You can also add in this Valve kit to splice into your standard vacuum to make attachment to the garden hose much easier. This kit also includes a valve for flow control. I recommend this additional part for a 100% professional Gravel Vacuum System.
I recommend removing the Gravel Vacuum when filling and using a suction cup attached to the hose to secure it to the inside of the aquarium when filling. However, it can be used with water returning thru the gravel vacuum, just make sure the whole vacuum is in the water before filling just in case the end becomes detached.
If the faucet adapter pump fits poorly to your sink/utility faucet, resulting in a messy spray of water, I recommend to simply wrap a small towel or similar around the faucet adapter, this will allow the water to drip harmlessly into the sink.
Bowls and Similar:
A mistake I have documented in several controlled tests is the "over cleaning" of bowls; meaning changing 100% of the water and scrubbing, sterilizing the bowl prior to reintroducing the fish (usually a Betta).
In these tests I documented an ammonia level as high as 2 ppm in as soon as 1 day after such a cleaning practice.
Better is a water change of 50% along with a simple wiping and rinsing of any substrate (such as marbles) and decor.
Better yet is to use a small sponge filter, Matrix (or similar) as a substrate, or use Matrix or similar in small medicine bottle that is only mildly rinsed with old bowl or de-chlorinated water. This would allow for at least some bio filtration and important bio stability to your small tank/bowl. As well this in turn will allow for more pH stability as well as even when RO water is used, frequent water changes negate the pH lowering effects of RO water due to lower KH.
Reference:
• Aquarium Chemistry; pH
Product Resource:
• SeaChem Matix; nitrifying bacteria filter media
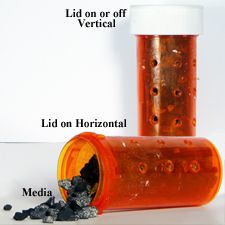
See the picture above for Matrix used in medicine bottles for a betta bowl.
In these tests I documented an ammonia level as high as 2 ppm in as soon as 1 day after such a cleaning practice.
Better is a water change of 50% along with a simple wiping and rinsing of any substrate (such as marbles) and decor.
Better yet is to use a small sponge filter, Matrix (or similar) as a substrate, or use Matrix or similar in small medicine bottle that is only mildly rinsed with old bowl or de-chlorinated water. This would allow for at least some bio filtration and important bio stability to your small tank/bowl. As well this in turn will allow for more pH stability as well as even when RO water is used, frequent water changes negate the pH lowering effects of RO water due to lower KH.
Reference:
• Aquarium Chemistry; pH
Product Resource:
• SeaChem Matix; nitrifying bacteria filter media
See the picture above for Matrix used in medicine bottles for a betta bowl.
Planted Aquarium: If you have a planted aquarium, I recommend #00 sand (3-5 cm) mixed with SeaChem Flourite, Eco-Complete, laterite or conditioned soil with #3 gravel (2-3 cm) on top; you should vacuum the sand as little as possible or at least not below the top ½ inch layer of #3 gravel. The reason is this fine sand and some planted substrates will tend to be sucked all the way thru the vacuum, and this will also disturb the natural aerobic and symbiotic anaerobic filtration going on in the substrate being performed by the plant roots and nearby bacteria (although areas of substrate without plants can be vacuumed more deeply).
If the sand must be vacuumed, very gently push the bell of the vacuum into the sand and quickly back out, kinking the hose with your other hand to slow the out flow to keep sand and/or plant substrate from being sucked up.
Product Resource:
• SeaChem Flourite- aquarium plant substrate media
This point is often lost by some aquarists, based on some very misinformed & even rude comments I have read including on my YouTube cleaning video (most of the rude have been removed too). In fact, in a planted aquarium, it is NORMAL to have very dirty appearing gravel when vacuumed, but one should not expect or try and achieve gravel appears 100% "clean" when vacuumed as this is not necessarily an indicator of tank healthy and in fact by trying to achieve this you end up with poor substrate nutrient levels for your plants and poor de-nitrification resulting in high nitrates. See the German method below.
Reef Tank: If you have a reef or Nano Reef aquarium with live sand, vacuum very gently as I described for planted aquariums and do not push the bell of the vacuum down into the sand more than ½” to ¾” so as to not add oxygen to anaerobic (de-nitrifying bacteria). By maintaining a 1/2" layer of #3 crushed coral on top of a fine deep sand bed it traps organic waste particles better and allows easier vacuuming of the top layer of gravel/sand.
I will occasionally push the vacuum bell deeper into the sand in alternating areas of the aquarium sand looking for buildup of organic debris/mulm and also to prevent sulfur reduction resulting in hydrogen sulfide production.
Reference:
• Hydrogen Sulfide production in anaerobic De-Nitrification for Aquarium/Pond Nitrate Removal
The idea is to vacuum most of the waste off the upper layer of gravel while occasionally pushing the bell into the sad allowing just enough oxygen and nitrates to penetrate so as to prevent sulfur reduction.
What you want to look for is areas of “black mold” in the sand bed, which is actually not mold but indicative of hydrogen sulfide production vie sulfur reduction.
This method is also important for a FOWLR aquarium (fish only with live rock) that employs sand for de-nitrification.
German Method: This method is really a variance of the freshwater planted aquarium cleaning method in my opinion. In some successful aquarium keeping traditions (especially in Germany), no vacuuming is performed. Water is simply siphoned out of the aquarium and new water is carefully added back in.
For this method to be successful in freshwater aquariums, you need a healthy growth of plants, good lighting, a thin layer of sand just enough to cover plant roots (not gravel). Good aerobic AND anaerobic filtration (that is nitrogen reducing, NOT sulfur reducing which would produce hydrogen sulfides) is also a must. This method can also be employed in part with other methods such as partial vacuum cleanings in certain areas as I do in my planted aquariums.
Further Reference:
• Aquarium Light Information: Correct Planted Tank Lighting
Flow Through Method: This method is the aquarium version of the “spring fed pond, or pond overflow method” that I use in ponds (this is especially useful for delicate fish such as Discus or German Rams, but this must be done correctly as well for these fish to be successful).
Commonly this method is set up in warehouse type setting but can be single aquariums as well. With this method, you would have a small drain right at the surface of the aquarium water line (usually with a strainer to prevent fish form accidentally getting in).
Water is added either from a large holding tank via a slow rate water pump or directly from the tap or well water lines. If added directly from tap water, your municipal water company must NOT use chloramines as these are not readily removed and remain in the aquarium for long periods of time, whereas chlorine in municipal tap water is not generally a problem if added at a rate of less than 10-20% per day, provided you have good aeration and possible some carbon filtration as well.
Personally, I recommend the use of holding tank or large drum, as chlorine may not be the only issue, such as low KH, pH or similar (even with well water). With the holding tank you can add buffers and minerals such as a Wonder Shell. This method can even be employed with marine aquariums; however, this definitely necessitates a holding tank for clean/mixed saltwater. Another variation on this method is much more simple or basic and that is (if you have time) to simply “skim” off a total of 10% of your water per day at varying intervals.
One advantage of this method (among a few) is that you will often have very health and balanced Redox.
Reference:
• Aquarium and Pond Redox
Whichever way you employ this method, if your tank has gravel or does not employ healthy de-nitrification (whether in a deep sand bed for marine aquariums or planted freshwater) you should still vacuum at intervals needed to keep water parameters to the desired levels of the fish you are keeping.
Product Resource:
• Wonder Shell: Time release aquarium, pond mineral block
Combine Methods: Since “HOW” (method used) you clean you aquarium as well as “FREQENCY” are subjective, while “WHY” (desired water parameters) is more objective you can often employ multiple methods of cleaning (as I do) and achieve excellent results as that is really the bottom line and those who will tell you that there way is the only way is often someone you do not want to get aquatic advice from. I recommend the method or methods that achieve what is outlined at the very beginning of this article and that is “The reasons for a Water Change/Cleanings”. As long as these points are met, whatever method or combination is working for you is good.
I vary this from client to client due to many variables such as bio load, feeding habits, filtrations, even frequency of visits. For personal tanks I am currently using some of the German/Planted tank method along with the overflow/skimming method, vacuuming and finally the use of an "Eheim Sludge Remover" to lower DOC.
Procedure and Refill (Continued): You can drain this water into a bucket or attach the siphon to a long hose and drain it outside or into a toilet using gravity. There are other products that hook on to the sink, but these are overrated in my opinion and wastes water.
It is simpler to just get a long hose and get an adapter and attach your hose to the sink to fill but drain your water into a garden where it will do some good (unless it is saltwater of course). If you do need this type of product, you can make a DIY model with a Lee’s Gravel Vac, a garden hose, a faucet adapter from a local Hardware Store, and a waterbed pump/drain. Lee’s also makes one that is less expensive than the Python and is exactly the same.
Product Resource:
• Lees Vacuum Kit
I prefer to leave the fish in during this process even if the aquarium is quite dirty, as I have found that more stress is added to the fish removing them and then placing the fish back in new water conditions that the fish are not accustomed to. Only in extreme circumstances did I remove the fish (even then, my results were better with a "flow through" cleaning method while leaving fish in).
Controlled experiments I performed in the late 70s along with discussions with others in my field confirmed that removal for cleaning is much more stressful to fish (this stress in these experiments often did not show up in immediate fish losses, rather with fish getting sick after cleanings).
Add water back slowly, and if tap water is used make sure the temperature is similar to the aquarium water already present in the aquarium, you can generally safely add warm tap water to correct this.
Although in the Marine aquariums I maintained, I brought my own water and it was invariably colder than the aquarium, but this does not present as much of a problem as many think. If you do some math; Say your aquarium is 78 F and you add 20% water back that is 68 F, that is 1/5th the volume, so 1/5th of a 10 F difference is only 2 F.
If hot water is needed, this is best added to a bucket of non-heated water from whatever source so as to not accidentally scald/burn fish pouring directly into the aquarium. This said, beware of internet myths stating you should never heat water in a microwave for an aquarium. I've done this MANY times over the years, primarily in offices with no other source for hot water. The problem is not how the water is heated, rather the direct pouring of any water that is too hot for you to touch directly into an aquarium that could then contact fish swimming by.
As well make sure your new water does not adjust the pH more than .2 on the logarithmic pH scale. For instance, a tank with a pH of 7.0 that has a 25% water change should not have water more than 7.8 or less than 6.2 added to it quickly.
Do not add RO (Reverse Osmosis) water directly (other than topping off for evaporation) until water is re-mineralized and buffered correctly. If blended tap and RO water is used, use of a water conditioner and at least some mineral electrolyte replenisher is highly suggested so as to prevent Redox and/or oxidative stress.
I should note that many aquarium maintenance professionals do not add any aquarium conditioners for water changes under 20% (or even more) in established tanks. This is certainly acceptable as a healthy/established aquarium generally will not have a problem with the small amount of chlorine that might be introduced, generally breaking it down more quickly than any harm can come to the fish in these diluted amounts.
That said I respectfully do not agree with this for the reasons that the use of many conditioners such as AAP Res-Q or Seachem Prime also help add electrolytes and balance Redox (albeit temporarily) which allows for less oxidative stress on the fish and further aids in the water quality improvement a water change provides.
As well if chloramines are present in your municipal water supply the use of a top-notch water conditioner such as Prime or Amquel Plus is a MUST since chloramines are much more stable and do not decay from water agitation, plus chloramines contain toxic ammonia. If ammonia levels are OK, but your tank/aquarium has new fish or has had some stress, AAP Res-Q or AAP Shieldex are a must (I generally use these two in most of my professional aquarium maintenance clients).
Please see this article for more about Chloramines:
• Aquarium Answers; Chloramines in Tap Water
What is more important is adding a de-chlorinator to your tap water (if tap water is used) WHILE the water is being added if you are filling via a hose, DIY Python, or similar device. I prefer to use the full strength of the water conditioner as per aquarium size so as to obtain all the benefits of reducers, electrolytes, etc. of your water conditioner. I will add approximately 25%-50% of the conditioner prior to start of the refill with the rest added incrementally as I fill.
If using a bucket, I add the water conditioner per each bucket prior to adding each bucket back to the aquarium. I also recommend adding further water conditioner as per the complete tank volume after bucket(s) are added to obtain all the benefits of the particular water conditioner used.
In healthy, well-established aquariums, I often use AAP Shieldex or AAP Res-Q. Both products remove chlorine & break apart chloramines (but do not remove ammonia). As well these are excellent redox reducers and add a slime coat (much better than Stress Coat). AAP Res-Q adds a medicated bandage that help prevent disease and is especially helpful with newer fish and stressful water changes.
Please see this article:
• Aquarium and Pond Answers - Water Conditioners Review
Prime or Amquel Plus is a must for tanks with ammonia or nitrite problems. Prime will bind ammonia into non-toxic ammonium (NH4) and neutralize nitrites as well as remove chlorine and chloramines (these are NOT a replacement for a properly cycled aquarium). AAP Shieldex is your best choice for new tanks without an ammonia/nitrite issue as it will also help with natural bio colonization. For everyday use in established aquariums, or especially with new fish or sick/recovering fish, AAP Res-Q should be your choice for a water conditioner.
Product Resources:
• AAP Res-Q
• AAP Shieldex
• SeaChem Prime
Cleaning Machines/Diatoms

A relatively new device that performs both water removal and recirculation thru a micron filter cartridge that is easily cleaned is the "Aquarium Cleaning Machine". This device uses a protected magnet-drive motor to remove or re-circulate your water thru a filter (or both). For freshwater aquariums this device is can be helpful, especially for those with larger or multiple aquariums. It saves time but more importantly it allows for a much better cleaning while at the same time leaving nitrifying bacteria behind (which often gets stripped in large conventional cleanings in tanks with high bio loads).
Sadly though, the company that owns the patent/builds this product has ceased production and due to mismanagement and poor customer service likely will not be available again.
Vortex Diatoms: Although not commonly used still can have their place for cleaning established aquariums with high bio loads, however with the advent of the aquarium cleaning machine which performs similar functions WITHOUT the need to stir up the tank as much and add stress to the fish by doing so, these have pretty much gone the way of the dinosaurs IMO.
Sludge Remover Vacuums: these devices are not as powerful or as efficient as a Vortex Diatom, however these do not stir up the water (which can stress fish) as much as a Diatom Cleaning Filter. The Eheim Sludge Remover Battery Vacuum is more efficient than most battery vacuums with a micron filter versus a bag as most “cheapie” battery sludge vacuums utilize.
However, neither of these devices actually perform necessary water changes. That said a good sludge remover vacuum such as the Eheim is an excellent way to remove organic mulm or rotting waste in between water changes, especially for smaller aquariums or aquarium keepers on a budget.
Product Resource:
• Eheim Battery Aquarium Vacuum, mulm, sludge remover
FURTHER READING:
• How To Clean A Fish Tank Like A Pro: 6 Aquarium Cleaning Methods For Optimal Tank Health
Reference Note: Part of this article written in 2005 was used without citation in a forum here:
• http://www.arosg.com/f153/nitrate-control-fw-sw-aquariums-6853/
What is noteworthy is that this forum post is much more recent, 2013. More interestingly it is only Google and their spammy algorithm that even brings up this non cited forum post. Other search engines such as DuckDuckGo, Yahoo, Bing do not show this forum since it did not cite their source. In fact, the other search engines note my blog post that I copied from my article in 2006.
What is sad is a very disrespectful forum (nano-reef.com) attacked me for plagiarizing my own content! A little homework and commons sense would have shown that the content in question was my own and being used by others without permission or at least proper citation.